
Organization has never come naturally to me. It’s something I have to work at constantly and truth be told, I’ve learned just how important it is, especially in business. A hard truth is, you just can’t run an effective business if you’re not organized. There is no gray area. It’s one area in this overly creative business that is solidly black and white. Sure, we creatives can typically throw things together and make it work but it typically results in a scattered, half effort mess. I learned a couple years ago that organization was key to my business and my life if I was going to make this thing work. Since then, I’ve developed systems to keep me and my creative left brain on track. And as much as I hate to admit it, it’s easier once you get used to it. I kind of like the ways of these right brained people every once and a while.
Something I did that greatly helped my business turn a corner from “overwhelming” and into a managed ebb and flow of procedures was actually writing out my workflow from start to finish. I figured out ways in which I was spending too much time on some things and where I needed to make changes. While it sounds like a silly thing to do, I highly recommend it. Especially because we photographers are visuals at heart, looking at it physically helped so much more than just going over it in the shuffles of my brain. I now plan my days and work along with each wedding’s workflow so that I’m consistently on top of each wedding, and nothing gets left under an unturned stone.
A great way to stay organized with workflow is by this fun DIY project. It costs around 15$ (or less) and can be made from materials you most likely have in your home right now. Using this customizable template (only 10$) from the lovely Yellow Wellies Designs on Etsy, you can print this workflow schedule at home. Insert the schedule into an 8×10 frame we all have laying around the house and BIZAM. One step closer to an organized business already.
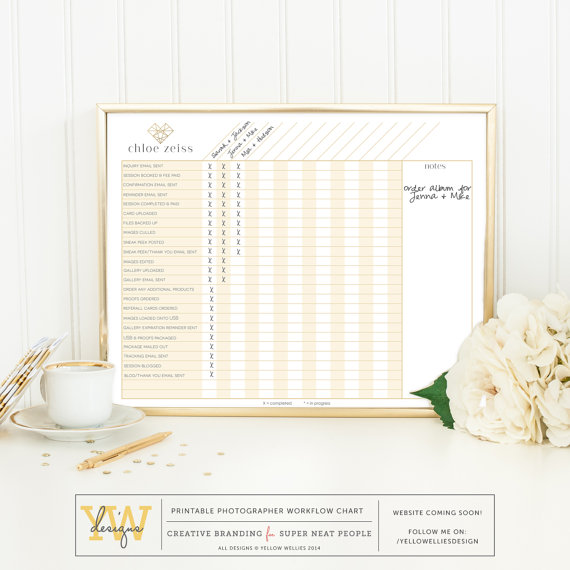
Image Source: Yellow Wellies Designs of Etsy
Here’s a complete list of my pre-wedding workflow for my clients:
- Initial inquiries – one of the greatest things about my website company, SHOWIT is that every inquiry submitted through my website is immediately text messaged to my phone. That’s right. No more checking the inbox every ten minutes thinking you might miss one. I no longer have to hover my inbox on the off chance that someone might be stopping by. When I get that text message, I stop whatever I’m doing and email them right back. It usually takes less than 10 minutes. If I’m not to where I can sit down and write them one, I at least email them to let them know I received it and would be getting back with them asap – or ask for a good time to call.
- The first call – typically if I don’t hear back from that first email, I wait a few days and then give them a call. Usually it’s been because they’ve been gathering information or discussing budgets- so I don’t worry too much when I don’t receive a reply back immediately via email. This phone call lets them know they’re still on my mind. I answer any and all questions they may have.
- Booking – for booking, I require a 500$ retainer and signed contract. For all my contracts and payments, I use a program called Honeybook. With honeybook, I can send them a GORGEOUS customized contract with payment plan included and they can pay their retainer all right in one spot. It emails them monthly installment reminders like a bill and keeps up with their payments for me.
- The Bridal Guide – just recently I worked relentlessly on designing a fully in-depth bridal guide to help educate my clients on engagement sessions, bridal sessions and wedding day. There’s tons of good information in there about how I work, creating timelines and what I need to help capture their day perfectly as well as preferred vendors, stress-free photo tips and lots more. All new brides will be receiving this bridal guide after booking. It’s 70 pages. The thing is a boss.
- Schedule an Engagement Session and Execute – The engagement session is the first thing we typically do together. While it’s their responsibility to schedule their engagement session, I help direct all my brides with locations, times, and even sometimes what to wear and style. When we meet for their engagement shoot, we already feel like old friends.
- I add a sublist here for Engagement Session workflow : A sneak peek cull, sneak peek edit and a sneak peek blog post as well as a full cull, full edit, and an upload and delivery of their engagement session.
- Schedule a Bridal Session and Execute – being in the south, our brides LOVE bridal portrait sessions — and so do I! They’re fantastic for expressing my creativity in a controlled environment and an excellent way to spend more time together. Bridal sessions are super fun and a joy – and just one more way in which to build trust with a client before wedding day.
- I add another sublist here for Bridal portrait session workflow : a full cull and edit, upload and delivery. I keep my favorites in a folder for a blog post to be posted after the wedding.
- The pre-wedding meeting – typically about 3 weeks out I ask for a finalized timeline from my brides. I also request a list of their vendors for the blog post and a family portraits shot list. From there, we’re all set!
Hopefully this helps get you started on a much more organized business. I’ll be posting another installment soon, The Complete Wedding Workflow, A Guide to an Organized Business Part Two: Post Wedding.


